Do you want to know, how to make your 404 page more appealing to the audience? If yes, then keep on reading.
By making the default 404 page more appealing to your audience, you can create a better user experience for them.
This will result in reduced bounce rate & increased page views.
Table of Contents
Why Make Your 404 Page More Appealing?
If someone visits a broken link on your website, they will land on the default 404 page.
And, if they don’t find what they are searching for they will leave your website & go to your competitor’s website.
This will increase your bounce rate, create a poor user experience & can create a negative impact of your website.
To avoid this situation, you need to make your 404 page template in WordPress more appealing to your audience.
When a visitor stays on your website, they are more likely to read your posts or make a purchase.
How To Make Your 404 Page More Appealing

So without further ado, let’s check out how to make your 404 page more appealing,
1). We are going to use 404page WordPress Plugin. You will need to install & activate the plugin.
2). After you have activated the plugin, create a new page with title “404 Error Page” by going to Pages => Add New.

3). Once you have created the page, customize it as per your specification.
You can customize the page by adding any widgets or blocks from the Block Editor of your page.
Check out the page below, I have customized the page in a very basic manner, just to show you, by adding Achieves, Categories & Social widgets to the page. After you are done with the customization, Publish the page.

4). Now, go to Appearance => 404 Error Page from your WordPress site Dashboard, you will find 2 options from the dropdown.

1). NONE (WP default 404 page) – If you select this option, you will get the default 404 error page that your WordPress site uses.
2). 404 Error Page – This is the customized page that we had created before. You can select this page from the dropdown & click on the “Save Changes” button. You can now view the page by clicking on “Test 404 Error” button. Below is the screenshot of the 404 Error Page,

You can also change the setting by going to Appearance => 404 Error Page => Advanced tab.
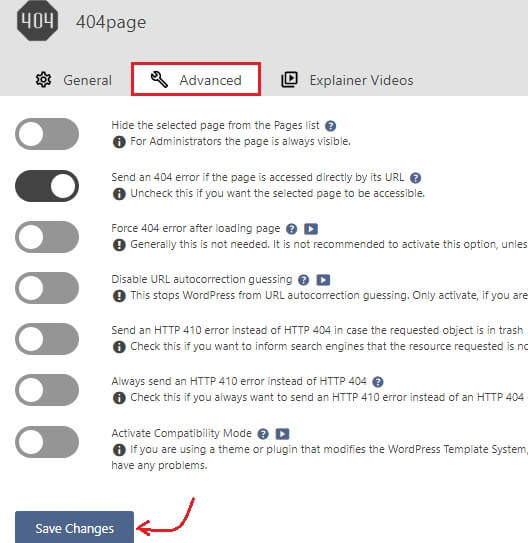
There are multiple Advanced settings options available. You can select any of those options as per your specifications by simply clicking on the Toggle button.
- Hide the selected page from the Pages list – Activating this option hides the page you selected as custom 404 error page from the ‘Pages’ menu for non admin users. For admin users it’s always visible. The page selected as 404 page is marked.
- Send an 404 error if the page is accessed directly by its URL – This option is activated by default and it is recommended not to change this setting. With this option active WordPress fires an 404 error in case the page you selected as your custom 404 error page is accessed directly by its permalink. The only reason to deactivate this option is if you explicitly want the page to be accessible.
- Force 404 error after loading page – After an 404 error occurred the 404page plugin loads your custom 404 error page. After that page is loaded successfully the 404 error is gone. Naturally the 404page plugin ensures, that a 404 error is sent back to the browser. But WordPress internally the error no longer exists.
- Disable URL autocorrection guessing – Maybe you’ve never noticed the URL Autocorrect Guessing feature of WordPress yet. WordPress tries to guess a redirection for a nonexistent URL if the slug is at the beginning of another URL. The downside is that WordPress is not exactly good at guessing URLs and often times makes the mistake of redirecting users to unmatched content.
- Send an HTTP 410 error instead of HTTP 404 in case the requested object is in trash – Activating this option has no visual effect. This will cause WordPress to send an HTTP 410 error code instead of an HTTP 404 error code in case the URL that was requested belongs to an object that is currently in trash.
- Always send an HTTP 410 error instead of HTTP 404 – Activating this option will cause WordPress to always send an HTTP 410 error code instead of an HTTP 404 error code.
Conclusion
404page WordPress Plugin makes is relatively easy for any beginner to create a 404 Error Page as per the specifications so that the error page is more appealing to the audience.