Interested in knowing, how to improve your Click Through Rate organically? If yes then, you have come to the right place.
CTR is the average clicks a page gets when displayed in search results.
Making your CTR better can help you do wonders for your blog in terms of getting more traffic to your website from search engines.
In this article, we’ll share some awesome techniques to improve your click through rate (CTR).
Table of Contents
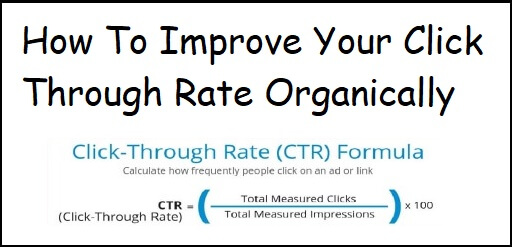
What Exactly Is Click Through Rate
In technical terms, CTR is the number of clicks that your article receives divided by the number of times your article is shown
Clicks ÷ Impressions = CTR.
In layman’s terms, let’s just say, one of your articles appeared 10 times in search results for a particular keyword & received 2 clicks so your CTR would be of 20%.
Search engine algorithms use CTR to analyze the performance of your website in search results.
The pages with a higher click through rate usually rank higher in search results.
By improving your CTR you can improve your over all SEO.
You can very easily find out, what your CTR is, by going to Google Search Console.
Without further ado, let’s start learning the techniques to improve your CTR organically.
How To Improve Your Click Through Rate Organically
Normally, you would like to start with the articles from your blog that are already ranking higher, have good search impressions, but low CTR.
After that, you shift to the remaining articles.
Strong Article Headlines
Your article’s title is the most important aspect if you want to improve your CTR.
The article title is what gets displayed in the search results.
So, it has to be relevant, catchy, and engaging to get the audience’s attention and get them to click on it.
There are several tools that will analyze the article titles & make suggestions to improve them.
We’ll be using the MonsterInsights plugin since it has a built-in headline analyzer.
It is one of the best Google Analytics plugin for WordPress.
Install and Activate the MonsterInsights plugin in your blog to use it.
In case you want, check out, how to install & activate a WordPress plugin.
The free version of MonsterInsights also includes Title Analyzer, so you can use that too.
Or you can simply use the Free Online Headline Analyzer tool by MonsterInsights.
Anyway, after installing MonsterInsights you will have to connect it with your Google Analytics account.
Once it is set up properly, you can edit any article where you want to optimize the title or headline.
On the post edit screen, click on the Headline Analyzer ‘H‘ button at the top right corner of the screen.

This tool will analyze your article headline & give you a score & some practical tips to improve your article.
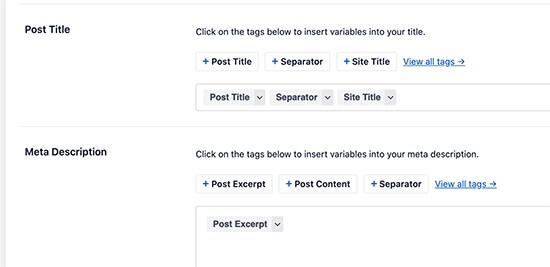
Keep The SEO Titles Dynamic
By default, WordPress uses your page or post title as the <title> tag in the HTML.
This title tag is used by search engines to display your website on in the Search Engine Result Pages (SERPs).
You can use All in One SEO plugin also known as AIOSEO to generate dynamic SEO titles for articles and pages.
AIOSEO is one of the best WordPress SEO plugins out there & is currently used by almost 2 million websites improve their CTR.
Please Note – Free version of AIOSEO is also available in the market.
Install & Activate the AIOSEO plugin.
After activation, the plugin will introduce your to a process for setting up everything.
Once the setting up is done properly, you can visit All in One SEO » Search Appearance page and switch to the Content Types tab.

You can make the SEO titles dynamic for all your posts, pages, products, or any other post types & this title will be used when a post or page doesn’t have its own title or description.
You can also edit any post or page on your WordPress website to edit it’s SEO title and description.
Simply edit the post and scroll down to the AIOSEO Settings section below the post editor.
You can add a custom SEO title for your post and page.
A live snippet preview of how it will look in search results, is shown in the following picture,
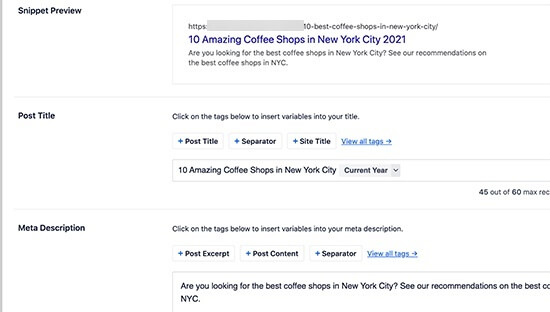
Dynamic tags like Current Month or Year in your post titles can also be used.
By doing this you won’t have to manually update them every year.
After you have made all the changes don’t forget to save them by updating your post.
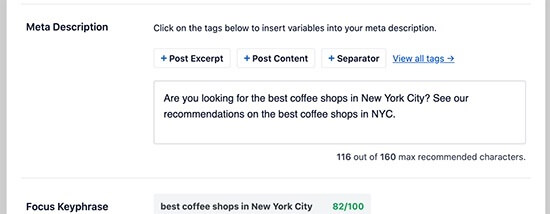
Make Meta Descriptions Useful
A meta description also known as meta description attribute or simply tag is an HTML element which summarizes the contents of your article so that the audience can know what the article is all about. The picture below shows an example of meta description.
You have to personally add the meta description to each of your posts & pages, because, if your don’t then by default you will get the same meta description that you added for your website as a whole.
Having said that, If you are using AIOSEO for WordPress, then you can simply provide your own SEO friendly meta description to each post& page effortlessly.
While filling in the meta description do make sure that your target keywords are included.
This will help your audience to know about your content better & also encourage them to click on it.
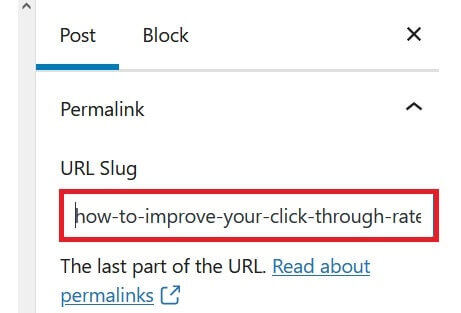
URL Slugs Should Give An Outline
URL slugs should give an outline of what the post is all about.
In other words, it should summarize the entire post in a few words in form of a URL.
Say for example,
https://www.conveyarena.com/how-to-improve-your-click-through-rate-organically/
Last part of the about URL “how-to-improve-your-click-through-rate-organically” is called as URL Slug, and your WordPress website or blog automatically generates it based on your post or page title.
Having said that, sometimes your post title might be too lengthy, hence making it less user friendly.
In such a scenario, you can edit the slug manually to make it more appealing & user friendly.
Simply go the Permalink option in your post or page. Here you can replace the default URL with your own user friendly URL.
But make sure that your URL does not have any capital letters or characters & all the words are separated by dashes.
After you have done, don’t forget to Save or Update your post or page.
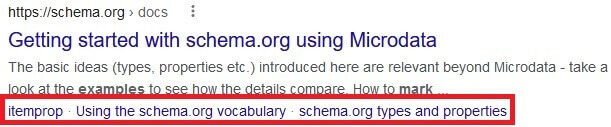
Use Of Rich Snippets Schema Markup
With the help of Rich Snippets Schema Markup you can have a proper structure to your data.
This is extremely useful when you want to show additional information with your content, in the search results.
Due to this your CTR improves.
An example of Rich Snippets Schema Markup is given in below image,
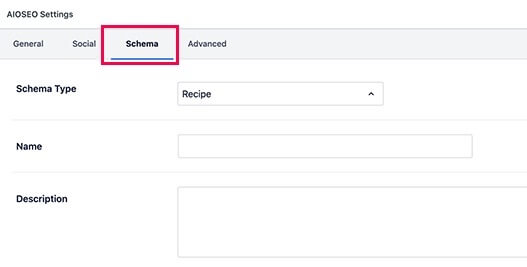
You can easily add rich snippets schema markup to your WordPress blog is by using AIOSEO plugin.
It comes with built-in support for schema markup & allows you to set it up for your posts, pages, products etc.

The settings allow you to use your blog posts as recipes, reviews, articles, with additional structured data for search engines to use.
Improving Local SEO
If your content is appearing in the search results but for the wrong audience then it’s of not use to you.
Local SEO can helps you solve that problem by allowing you to target regional audiences.
Consider the below example, where the audience wants to find Italian restaurants near them.

Local SEO can allow you to rank for targeted audience, which is more relevant for you & which can boosts your CTR.
Open up a Google My Business Account.
By doing so, you can add your business listing & manage all your business information easily using their dashboard.

The AIOSEO plugin has a Local SEO addon.
This addon allows you to add your business information as Schema markup to your website / blog.
Information such as Business Name, Business Image, Opening Hours, Phone Number etc. can be added for search engines to use in their results.

Stop Keyword Cannibalization
Keyword cannibalization means that you have various blog posts or articles on your website that can rank for the same keywords in the Search Engine Result Pages (SERPs).
Due to this problem, the search engine may ignore more relevant content & may show less relevant content.
Besides, even if you are successful in ranking two posts for the same keyword, you may give a wrong impression to the audience.
Consider the example below,
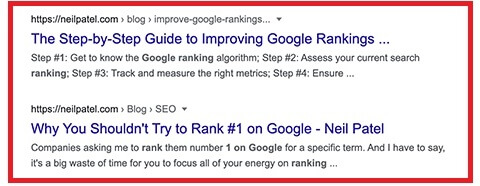
In this example, both the results are contradicting themselves. The audience might loose their trust in you if such a situation arises.
Improve Your Page Load Time
As you might know that, speed is everything when it comes to a website on the internet.
If your website does not open in 2-3 seconds, you may loose up to 70% of the traffic in-turn loosing a lot of revenue due to bad CTR.
For making your website or blog load faster, you can do the following things,
- Install A WordPress Caching Plugin.
- Optimize Images.
- Use A Reliable Hosting Provider Such As Bluehost Or SiteGround.
- Use A CDN.
- Install SSL Certificate For Your Website.
Convert Your Audience Into Subscribers
This is one of the most important things to consider when you want to grow your CTR organically.
This scenario is more or less like the chicken & egg problem, What Came First?
Subscribers can visit your blog posts every time you publish them, indicating to the search engine that your blog is of value & this will get your blog higher in search results which can fuel your CTR. With a high CTR you can get more subscribers.
Both the things can act as a fuel for each other.
For getting more subscribers, you can use one of the best plugins available in the market, Email Subscribers And Newsletters.
With Email Subscribers And Newsletters, you can easily boost you conversion rates, make more sales, and grow your email list.
The plugin comes with superbly designed lightbox popups, countdown timers, notification bars & spin the wheel popups.
Conclusion
Click Through Rate (CTR) is one of the most important keys to your website/blog success.
If you follow the given steps in this article in a holistic manner, then no one can stop you website/blog from getting ranked higher & making sales.
