This article will give you, Contact Form 7 WordPress plugin detailed review. This WordPress Plugin is used to create contact forms for blogs & websites.
I have used this plugin for quite a while.
Table of Contents
Contact Form 7 WordPress Plugin Detailed Review
So, without further ado let’s dive right into it.
Introduction
Contact Form 7 is one of the best plugins, I have used on my website. It is extremely easy to install and use.
For people who want to start a blog, this is one of the best available options in the market, if you want to include a contact form for your website or blog. You can create multiple forms with Contact Form 7 and also customize it easily.
The form supports the integration of CAPTCHA validation and Akismet (plugin for filtering out spam).
This makes it secure from spam attacks, that any website usually experiences. Since spam protection is a critical aspect for any web form, Contact Form 7 plugin provides several types of spam protection modules to effectively block any submission by spammers.
That gives you an advantage over others since you don’t have to waste your time on deleting spam messages and you can concentrate on content creation.
Having said that, if you activate certain features of Contact Form 7, the audience’s personal data, including their IP address, may be sent to the service provider. Thus, confirming the provider’s privacy policy is recommended.
These features include:
- reCAPTCHA (Google)
- Akismet (Automattic)
- Constant Contact (Endurance International Group)
As far as Contact Form 7 is concerned, its relatively safe for use since,
- Users are not tracked.
- Records of the any information are not being kept in their database.
- Data is not being sent to external servers.
- Cookies are not used for tracking.
Its recommended, that you use 2 more plugins, with Contact Form 7, which will help you enhance the functionality of your forms.
Both these plugins are created by same person Takayuki Miyoshi, who also created Contact Form 7.
- Flamingo – With Flamingo Plugin, you can save submitted messages via contact forms directly in to the database.
- Bogo – With Bogo Plugin, you get an option to add a multiple languages for the use of your audience who want to contact you.
Use Of Contact Form 7
Use of Contact Form 7 is simple. It acts as a bridge between the owner of the website and the audience.
It simply means that, with Contact Form 7, your audience or subscribers can contact you directly, through the form.
This will not only strengthen your bond with your audience but keep them engaged with you blog, in-turn generating revenue for you.
As mentioned in the introduction, Contact Form 7 supports CAPTCHA validation and Akismet spam filtering which ensures that your website’s not hacked and is safe for your audience to contact you.
It also does not track the audience or keep a record of them anywhere, ensuring that their data is safe.
If the audience feels safe they will be more willing to engage with you, contact you, suggest you, appreciate you.
Contact form 7 helps create a long lasting bond between you and your audience and it also gives the audience an opportunity, to directly get in touch with you.
Install And Activate Contact Form 7
There are 2 ways of installing Contact Form 7. We will have a look at both the methods.
Method 1 : By Uploading Plugin
- Go to Contact Form 7 page, of the official WordPress Website, by clicking here.
- Click on the Download button to download the plugin and then save it on your computer.

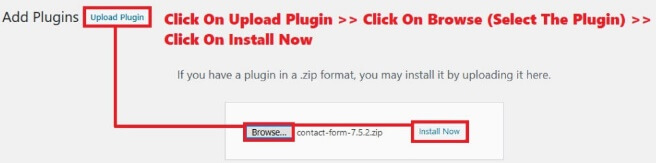
- Go to your WordPress Dashboard, and then go to Plugins => Add New.

- Click on the Upload Plugins => Browse & Select The Plugin => Click on Install Now.
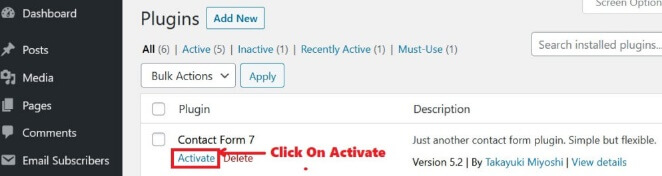
- Go to Plugins on your WordPress Dashboard and Activate Contact Form 7 plugin.
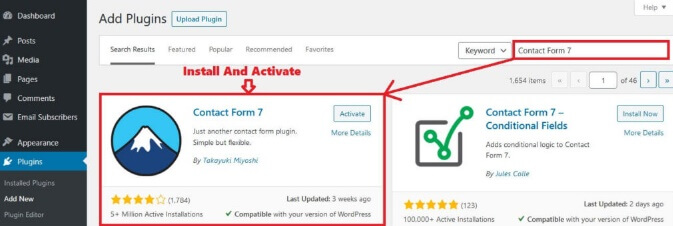
Method 2 : By Searching WordPress Repository
- Go to your WordPress Dashboard, and then go to Plugins => Add New.
- Type Contact Form 7 in the Search Box. Install and Activate Contact Form 7.
Configuring Contact Form 7
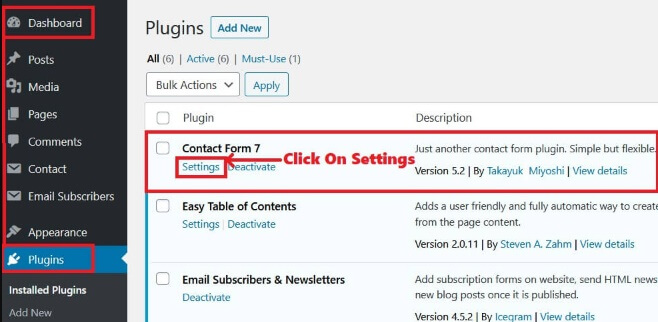
After you have successfully installed Contact Form 7 you will have to configure the plugin to use it. For configuring it, you will have to go to the Settings.
- Go to WordPress Dashboard => Plugins => Contact Form 7 => Settings
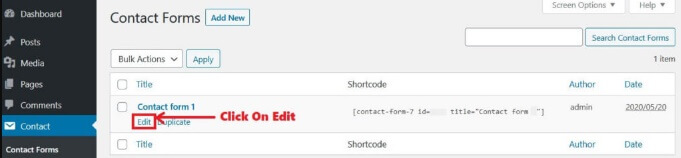
- On the next screen, Click on Edit link below Contact form 1.
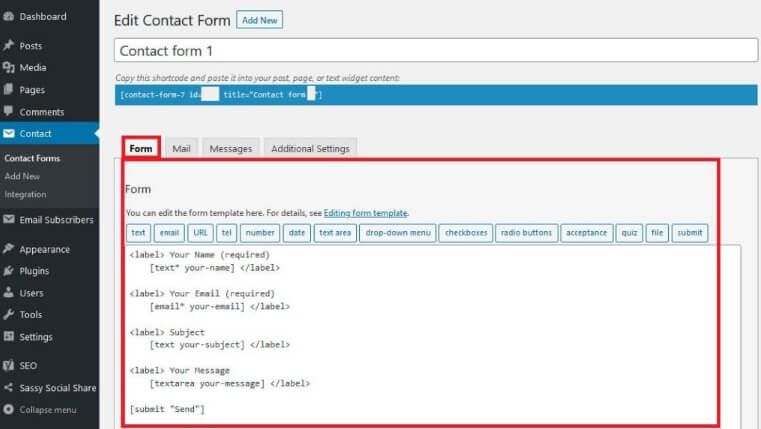
- You will have multiple menus for editing the Contact Form 7. The menu items are as follows,
- Form
- Message
- Additional Settings
Form – In this menu item, you can edit the form template. To make the template as per your specifications, you will get options such as, text, email, URL, number, date, check boxes, radio buttons, file, submit button etc. which you can insert into the form, you will just have to drag and drop the options on the form. Similarly, if you don’t want any options which are already present on the form, then you can remove those items as well, by deleting their code from the form.
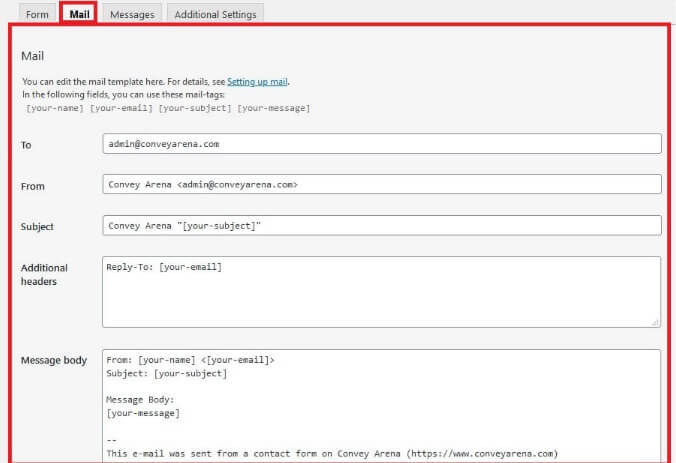
Mail – In this menu item, you will see all the options for setting up your email, such as, To, From, Subject, Message Body, File Attachments etc. To is where you will receive all the messages sent via Contact Form 7 on the given email address, From is where sender’s email address goes (in almost all the cases its the same as To), Subject is where subject of the message goes, Message Body is where the actual message goes.
Messages – In this menu item, pre-typed messages are stored. Whenever the audience or the subscriber sends a message, using this form, he or she will get a message back, stating whether the form was submitted correctly or not. For example, if the form is submitted without any errors, then the subscriber will get a message, “Thank you for your message. It has been sent.”.
If there is a problem in submitting the form, then the subscriber will get a message. “There was an error trying to send your message. Please try again later.” Similarly, there are messages for all the eventualities, say, if you have not filled all the fields, or you have entered the wrong date format etc. You can customize these messages as well.
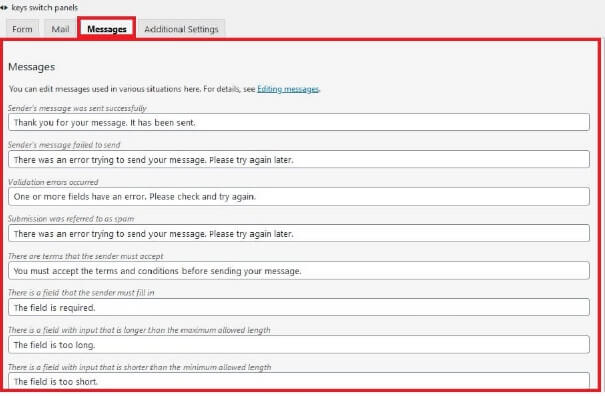
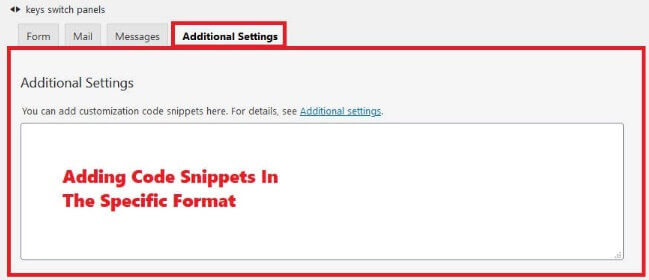
Additional Settings – You can include additional settings to each contact form by adding code snippets in the specific format into the Additional Settings menu item.
After all the settings are done, click on the Save button to ensure that the changes you made are not lost.
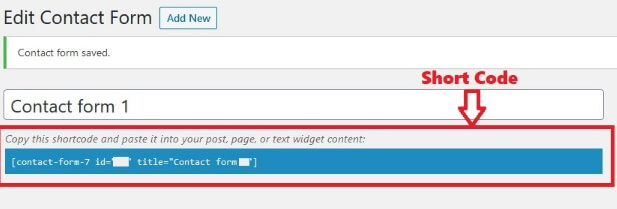
Implementation Of Contact Form 7
Implementing Contact Form 7 is very easy. All you have to do is copy the shortcode for the form and paste in on the page where to want the actual form. Usually, the page where the shortcode is pasted is the Contact page.
You are all set and done.
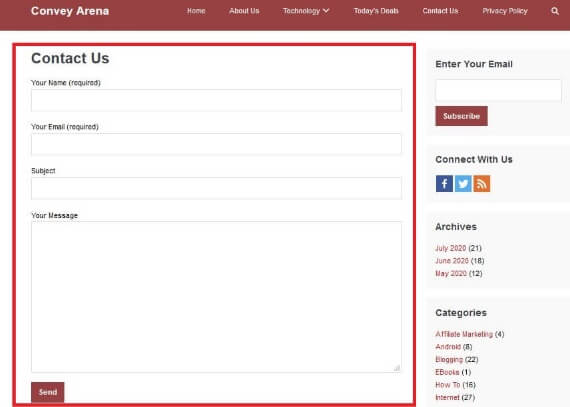
Now just, Publish the page. While filling the form, the audience will have to fill their details, i.e. Name, Email Id, Subject, and Message and then Click on Send to submit the form. The message is sent to the email address, which is mentioned in the To section of the Mail menu item in the Settings.
The Contact Form 7 on the Contact Page will look something like the photo given below.
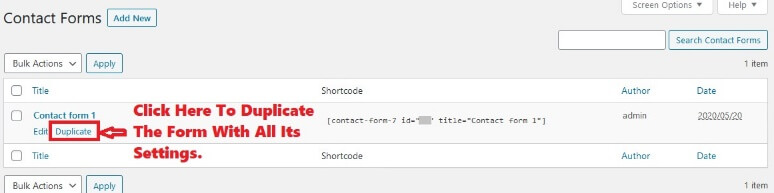
If you want, you can also duplicate the form with all its settings, by clicking on duplicate link shown in the photo below. This will save up a lot of time and energy.
Conclusion
I have tried many contact forms for my website, but Contact Form 7 is definitely better than many of its competitors especially because it is super easy to implement and use.